Flask-Blogging: A Python Flask Blog Engine as an Extension
July 04, 2015 by Goutham BalaramanThis post will give an introduction to Markdown based Flask blog engine extension.
I wanted to add a blog to my flask site. I decided to write it as an extension. This makes the blog code easy to plug into any site, and fairly reusable.
Flask-Blogging is a blog engine as a Flask extension based on Markdown. Please see:
- Flask-Blogging documentation
- Flask-Blogging github project page
Out of the box Flask-Blogging has support for the following:
- Bootstrap based site
- Markdown based blog editor
- Models to store blog
- Authentication of User’s choice
- Sitemap, ATOM support
- Disqus support for comments
- Google analytics for usage tracking
- Well documented, tested, and extensible design
Minimal Example
Here is a minimal example for getting a blog up and running. There is no security in the authentication here. But if you have authentication setup using either Flask-Login or Flask-Security, it should be straight forward to configure authentication. This example uses version 0.3.2.
from flask import Flask, render_template_string, redirect from sqlalchemy import create_engine, MetaData from flask.ext.login import UserMixin, LoginManager, \ login_user, logout_user from flask.ext.blogging import SQLAStorage, BloggingEngine app = Flask(__name__) app.config["SECRET_KEY"] = "secret" # for WTF-forms and login app.config["BLOGGING_URL_PREFIX"] = "/blog" app.config["BLOGGING_DISQUS_SITENAME"] = "test" app.config["BLOGGING_SITEURL"] = "http://localhost:8000" # extensions engine = create_engine('sqlite:////tmp/blog.db') meta = MetaData() sql_storage = SQLAStorage(engine, metadata=meta) blog_engine = BloggingEngine(app, sql_storage) login_manager = LoginManager(app) meta.create_all(bind=engine) # user class for providing authentication class User(UserMixin): def __init__(self, user_id): self.id = user_id def get_name(self): return "Paul Dirac" # typically the user's name @login_manager.user_loader @blog_engine.user_loader def load_user(user_id): return User(user_id) index_template = """ <!DOCTYPE html> <html> <head> </head> <body> {% if current_user.is_authenticated() %} <a href="/logout/">Logout</a> {% else %} <a href="/login/">Login</a> {% endif %}   <a href="/blog/">Blog</a>   <a href="/blog/sitemap.xml">Sitemap</a>   <a href="/blog/feeds/all.atom.xml">ATOM</a> </body> </html> """ @app.route("/") def index(): return render_template_string(index_template) @app.route("/login/") def login(): user = User("testuser") login_user(user) return redirect("/blog") @app.route("/logout/") def logout(): logout_user() return redirect("/") if __name__ == "__main__": app.run(debug=True, port=8000, use_reloader=True)
Screen Shots
Blog Editor
Here is a screenshot of the blog editor page. This editor uses the awesome Bootstrap-Markdown editor.
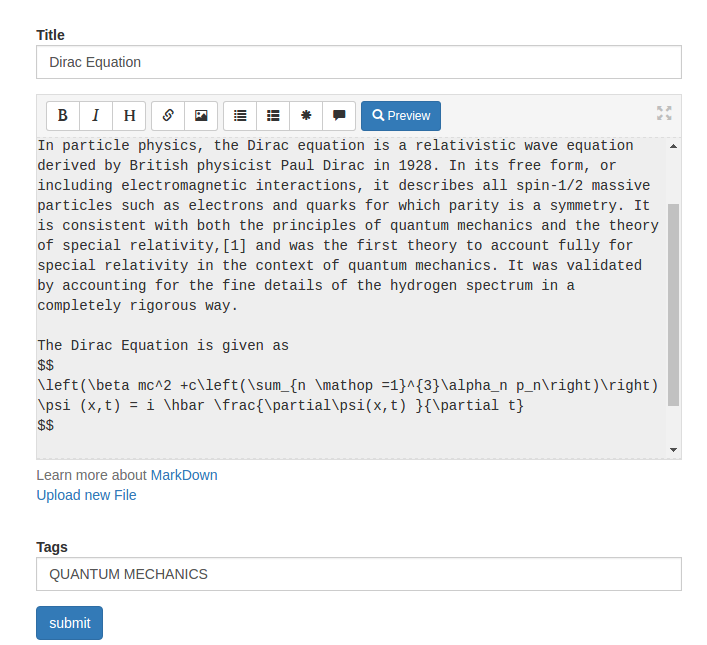
Blog Editor
Blog Page
The blog page when rendered looks as shown here. The page is configured out of the box to include LaTeX support. The math is rendered using MathJax. I have thought about using KaTex, but decided to wait till they have support for eqnarray. As you can see, it uses Disqus for comments.
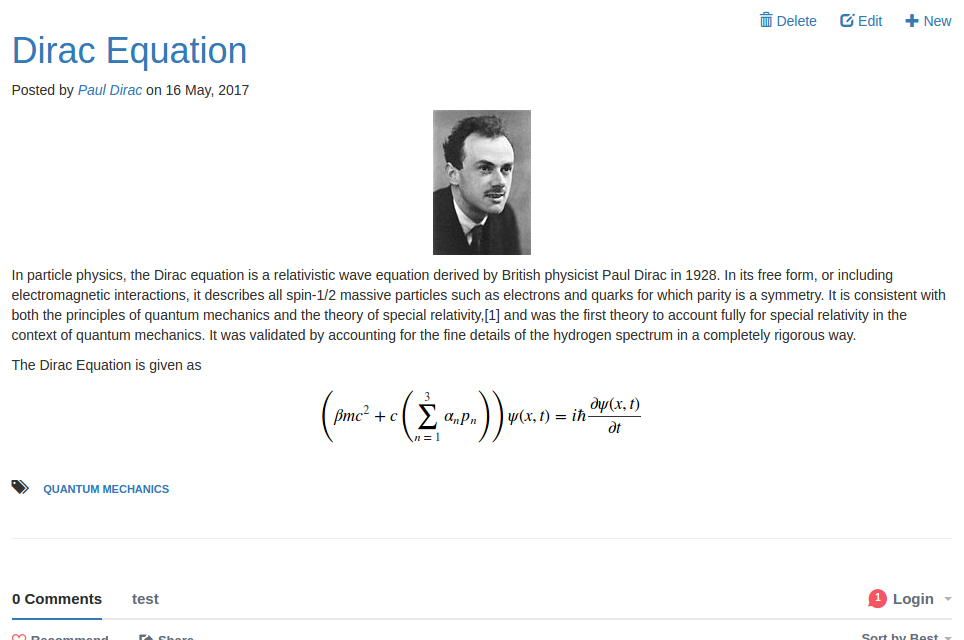
Blog Page
Installation
Install the extension with the following commands:
$ easy_install flask-blogging
or alternatively if you have pip installed:
$ pip install flask-blogging
Conclusion
Here I introduced the Flask-Blogging extension that can be used as a flask blog engine to your flask site.
python flask programming
Related Post
- QuantLib Python CookBook Is Almost Done
- Securing Authentication Tokens
- Adding Caching to Python Flask-Blogging Engine
- Flask App Directory Structure
- Minimal Flask-Login Example
I am Goutham Balaraman, and I explore topics in quantitative finance, programming, and data science. You can follow me @gsbalaraman.
Updated posts from this blog and transcripts of Luigi's screencasts on YouTube is compiled into QuantLib Python Cookbook .